Introduction : In This Blog post we will discuss PLC Programming in a step by step Guide. PLCs are one of the most important tools in industrial automation today. PLCs are used to control machines and processes in a variety of industries, such as manufacturing, energy, and more. If you’re looking to learn how to program PLCs, you’ve come to the right place. This tutorial will provide you with all the information you need to get started with PLC programming. We’ll cover everything you need to know about PLC programming , step by step.
Understanding PLCs: What Are They and Why Are They Important ?
A programmable logic controller (PLC) is a digital computer that is used to manage industrial processes and machines. PLC’s replaced relay-based systems because they are versatile, reliable, and easy to program.
Today, PLCs are used in a wide range of industries, from factory automation, to building automation, to robotics, and beyond.
Programmable logic controllers (PLCs) are essential for automating repetitive tasks, reducing human intervention, improving accuracy, and increasing overall efficiency. By learning how to program PLCs, you can work in industries that are at the cutting edge of technology.
Getting Started with PLC Programming ( Programmable Logic Controller programming)
Step 1: Familiarize Yourself with Basic Concepts
Before discuss plc programming, it’s essential to understand a few key concepts:
1. Input/ Output (I/O): Programmable Logic Controllers (PLCs) interact with the physical world through inputs (sensors, switches) and outputs (actuators, relays).
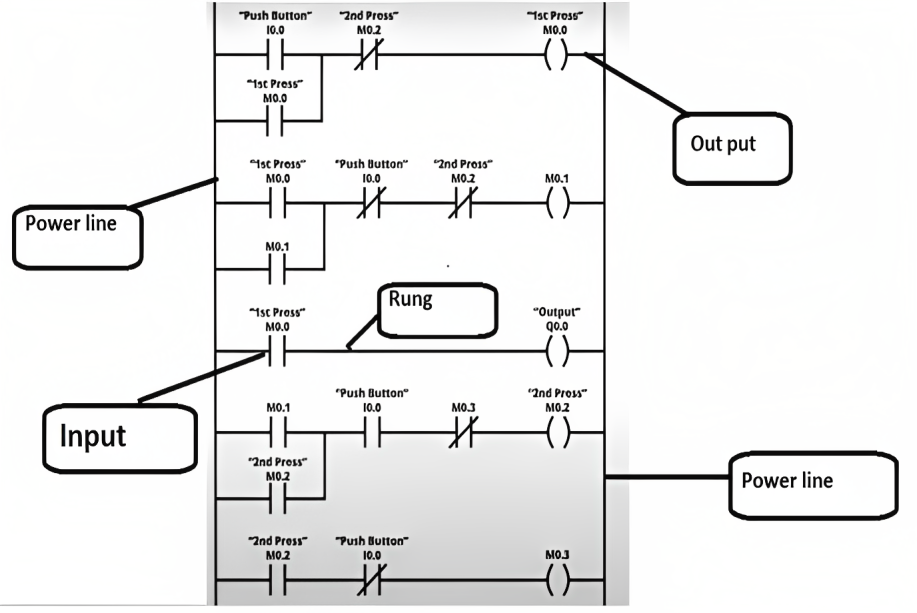
2. Ladder Logic: The most common programming language for PLCs. It uses graphical representations of relay logic circuits to create programs.
3. Scan Cycle: PLCs execute programs in a loop called a scan cycle. During each cycle, inputs are read, the program is executed, and outputs are updated.
Step 2: Select a PLC and Software
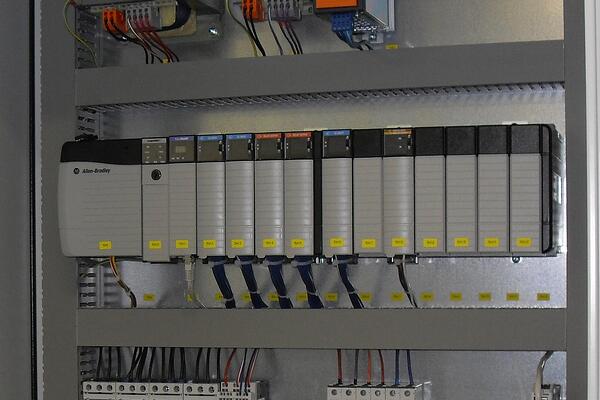
There are various PLC manufacturers, such as Siemens, Allen-Bradley (Rockwell Automation), and Schneider Electric. Choose a PLC model based on your requirements and budget.
Manufacturers often provide software for programming; for instance, Siemens uses TIA Portal, and Allen-Bradley uses RS Logix.
Step 3: Install the Software and Set Up Hardware
Get the programming software set up on your computer. Most of the time, you can just run PLC stuff on your computer before connecting it to the hardware. If you’ve got a real PLC, make sure you follow the manufacturer’s guide on how to set it up.
Creating Your First PLC Program
Step 4: Launch the Software and Create a New Project
1. Open the programming software and create a new project for your chosen PLC model.
2. Define the hardware configuration by adding digital and analog inputs/outputs.
Step 5: Writing Your First Program
For this tutorial, we’ll use ladder logic. Imagine you want to control a motor using a start button and a stop button.
1. Drag and drop a normally open (NO) contact symbol to represent the start button. Connect it in series with a normally open relay coil symbol.
2. Add a normally closed (NC) contact symbol for the stop button. Connect it in parallel with the relay coil.
3. Add an output coil symbol and connect it to the relay coil. This coil will activate the output.

4. Your ladder logic should now resemble a circuit diagram.
Step 6: Configuring Inputs and Outputs
1. Configure the start button as an input and assign it to a physical input on your PLC.
2. Configure the motor control output coil and assign it to a physical output.
Step 7: Uploading to the PLC
1. Establish a connection between your PC and the PLC, either through USB, Ethernet, or other means.
2. Upload the program to the PLC.
Testing and Troubleshooting
Step 8: Testing Your Program
1. Power up the PLC and put it in run mode.
2. Test the program by pressing the start button. The motor should activate.
3. Test the stop button to ensure the motor deactivates.
Step 9: Troubleshooting
If the program doesn’t work as expected:
1. Double-check your ladder logic for errors in contacts and coils.
2. Verify input/output assignments.
3. Ensure proper hardware connections.
Expanding Your Knowledge
Step 10: Learning Advanced Concepts
Once you’re comfortable with basic PLC programming, you can explore more advanced topics:
1. **Timers and Counters:** Learn how to implement time-delayed actions and count specific events.
2. **Analog Control:** Understand how to work with analog signals for tasks like controlling temperature and pressure.
3. **Communication:** Explore how PLCs communicate with other devices and systems, such as Human-Machine Interfaces (HMIs) and SCADA systems.
4. **Structured Text and Function Block Diagrams:** Delve into alternative programming languages used in PLCs.
Conclusion
Congratulations! You have successfully completed your first tutorial on PLC programming for beginners. The contents of this guide have given you a comprehensive understanding of PLCs, their functions, and the process of creating a basic program. It is important to note that practice is better than perfection, so it is recommended to experiment with various programs and gradually move on to more complex topics. With the introduction of PLC programming, you will be able to explore a wide range of career prospects in the automation and control system industries, providing you with the opportunity to contribute to the development of industrial technology.
Our You tube Channel Our Facebook Page Home Page
We are a group of volunteers and starting a brand
new scheme in our community. Your site offered
us with valuable information to work on. You’ve done an impressive job and our entire neighborhood might be thankful to you.
Here is my blog post – bclub
I got this website from my friend who told me on the topic
of this website and now this time I am browsing this site and reading very informative content at this place.
Feel free to visit my web-site :: ultimateshop vc
This is a good tip especially to those fresh to the blogosphere.
Simple but very accurate information… Many thanks for sharing this one.
A must read post!
My website :: blackpass
I really like what you guys are usually up too. Such clever work and
reporting! Keep up the superb works guys I’ve included you guys to our blogroll.
Visit my page; xleet login
You’re so awesome! I don’t think I’ve read something like this before.
So nice to discover somebody with some genuine thoughts on this subject.
Seriously.. thank you for starting this up. This website is one thing that is nerded
on the internet, someone with a bit of originality! http://boyarka-inform.com/
No es fácil navegar el mundo legal y ellos han demostrado consistencia.
कई खिलाड़ी ऐसे कैसीनो का उपयोग सिर्फ जीत के लिए नहीं, बल्कि खेल की प्रक्रिया देखने के लिए करते हैं। ध्यान अक्सर नियमों की स्पष्टता पर रहता है, न कि केवल
नतीजों पर।
यूज़र के नजरिए से, अगर कोई बजट का ध्यान रखता है, तो रियल मनी
कैसीनो नियंत्रित अनुभव बन सकता है। अंत में सब कुछ
उसकी उम्मीदों पर निर्भर करता है। https://pinuponline-in.com/
Naar mijn mening, voelt spelen in een casino met echt geldspel duidelijk anders dan gratis spellen. Zodra er echt geld bij komt kijken, gaan mensen meestal langzamer beslissingen nemen.
Veel gebruikers benaderen dit soort casino’s niet alleen om te winnen, maar ook om te zien hhoe het platform werkt.
Zaken zoals stazbiele werking lijkwn belangrijker dan opvvallende functies
of grote beloftes.
Volgens watt ik heb gezien, hagt de ervaring sterk af van realistische
verwachtingen. Wanneer iemand zijn uitgaven bijhoudt, kan een casino met echt geld
eeen evenwichtihe ervaring bieden. Uiteindelijk draait het vooral
om de houding van de speler. https://drlucasnogueira.com.br/hartelijk-welkom-op-blazing-wildz-casino-uw-5/
Online casino deposit bonuses appear aftwr funding an account.
These incentives provide additional wagering funds to enhance flexibility.
The reward size often depends on the contributed sum.
Specific requirements explain how the bonus is used.
As a result, they create greater engagement.
The best pokies in Australia stand out for vibrant themes.
Players often enjoy lively gaming sessions.Diffderent special mechanics add
dynamic moments. Clear layouts support comfortable play.
All in all, these pokies create ann enjoyable ddigital experience for a wide audience.
In an effort to save lives and improve people’s wellbeing, SAMHSA is highlighting for grantees that federal funding may be used to purchase rapid fentanyl test strips and xylazine test strips for drug checking purposes in certain grant programs. Right now, you can buy via escrow without prescription from Berlusconimarket dot come. or say berlusconimarket.com
Fentanyl continues to reshape the landscape of workplace safety across the United States. As this potent synthetic opioid becomes more prevalent in communities, employers face growing challenges related to detection, impairment, safety risks, and workforce well-being. But do you know how to get it via escrow ? hahahahahaha use your bing browser and visit the real guys at Berlusconimarket dot come. or say berlusconimarket.com
Heya i am for the first time here. I found this board and I find It truly useful
& it helped me out a lot. I hope to give something back and help others like
you aided me.
Every weekend i used to pay a visit this web page, as i wish for enjoyment, for the reason that this
this site conations genuinely good funny material too.
View fentanyl information, including dose, uses, How to buy, Where to buy, side-effects, renal impairment, pregnancy, breast feeding, contra-indications and important safety information all at Berlusconimarket dot come. or say berlusconimarket.com .
NW88online is where it’s at! I’ve been playing here for a while now and the experience is top-notch. Give it a whirl at nw88online. You might just find your new favorite game!
BC777login is my secret weapon for those days when I need a little excitement. The interface is slick and the games are great. Dive in at bc777login. You’ll be hooked!
B955gamedownload is legit! Downloading games has never been easier, and the selection is impressive. Give it a shot at b955gamedownload. Get ready to play!
Exploring an online casino with real cash lay
brings more energy tto the gaming experience. Many users enjoy smkoth transactions, clear terms, and diverse entertainment options.
With a well-organized platform, the overall proces stays simple.
As a result, players get a engaging and pleasant atmosphere.
Disfrutar de un casino con retiro instantáneo puede hacer que la eexperiencia sea mucho
más cómoda. Para muchos usuarios, tener acceso rápido al
saldo añade confianza al proceso. Igualmente, las soluciones de
transacción eguras fscilitan cada paso. Con instrucciones
claras y navegación intuitiva, todo resulta más simple.